Color Grading on a Budget
If you’ve found this post, you’re looking into low-budget color grading solutions, which means you’ve already dipped your toes into cinematography/videography and/or photography, and you’re looking to up your post-production game. By now, it probably goes without saying that all of this “pro artist” stuff gets really expensive really fast.
What are we looking at for absolutely top-of-the-line, blockbuster color grading? Some $5,000+ for the monitor. The monitor. That’s not even considering additional hardware to pipe the signal TO the monitor, or that $30,000 control surface, or a computer worthy of pumping said signal to said monitor, or — let’s just stop. Most people can’t afford this — even people with the skill and know-how to deserve it.
So, what are some lower-cost strategies to just get off the ground?
Level 1: “No, seriously, I’m broke AF”
At the absolute, most minimal-of-minimal level, you have to calibrate your monitor. Whatever it is. I don’t care. A TV, a gaming monitor, a Game Boy Advance — calibrate it. This is done with an external instrument that you place on the screen, and some software runs for awhile, creating and installing a “color profile” in your OS that’s as close to a neutral & accurate relative reference as it can get.
There are a lot of big pitfalls & weaknesses if this is all you can do, running with a cheap consumer screen, but at this point — I understand, there’s really no choice. At least you’re calibrated, and that’s better than nothing.
DisplayCAL is a free and dang thorough calibration software, available for Windows, MacOS, and Linux. Awesome! Now we just need an instrument — the colorimeter — to pair with it.
You have some options…

Believe me, I feel you.


Level 2: This is really why Macs are still a thing.
Note that at this point, Level 1 still applies. You still need to calibrate if you go with a Mac.
It’s 2019, and Macs have largely fallen out of favor with creative professionals who’ve been keeping up with things. This is hardly a debate anymore — either you already know, or your knowledge has fallen behind. However… HOWEVER. One of the criticisms of the cost of a Mac, in the context of this application, is actually a central focus of why to consider buying one.

You see, a generous chunk of the cost of an iMac or Macbook Pro is the screen — a wide-gamut, 100% DCI-P3 display. The 5k iMacs are 10-bit displays, making them a particularly tasty offer. I’m not aware of any other comparable screens on the market above 4k, but if I were to guesstimate overall value: well over $2000. Other Mac displays are “8-bit + FRC,” a method of emulating the often much more expensive 10-bit displays.
Mac displays are measured at about the same performance as an Eizo CS2420 — a nearly $1000, 1200p, 24” monitor — with higher resolution to boot… 2.8k (1800p) on the Macbook Pro, 5k on the iMacs!
Check out these in-depth reviews of the Macbook Pro and iMac displays.
For a lot of other users on a budget, this is complete spec overkill and they’d be needlessly burning money that should go to (much) more powerful hardware. But for you? For you, this is a well-above-average display with a computer attached. It’s a package deal. For you, this “overkill” is actually completely relevant!
This is a large contributor to why the Macbook Pro is the current mobile companion to my PC workstation.
There are some things to consider:
Because the display is a big part of your purchase consideration, it’s not really worth it if you go with the small screens. I’d go 15” MBP or 27” iMac, or consider a different route.
If you think you’ll be able to graduate to a superior display soon after buying the Mac, then the tight-budget value prospect of the Mac purchase goes down.
If you’re planning to work in Davinci Resolve, the ideal workflow is to send the video signal to an external monitor with separate color management. Once you progress to this, the up-front significance of the Mac’s display (and thus the value proposition of buying it) will drop significantly.
You can’t go too low on the rest of the hardware specs. Remember, you need some hope of running the footage as well.
This all falls by the wayside if you also need significant horsepower relative to cost, say, for motion graphics, brutal RAW-based video editing, heavy simulations in VFX (well, VFX in general), intense vectorized workflows, etc. This is where Macs have been losing for years now, with the most recent nail in the coffin being their abandonment & recent exclusion of the CUDA API in MacOS Mojave.
These caveats might price you out or make a Mac less ideal, and you might look towards Level 3.
Some Macs to consider:


Level 3: “Just show me some monitors.”
Here are some $1000-and-below options. This is where “on a budget” starts to get pretty relative. Actually, I guess it got relative at Level 2. I told you, this stuff just gets expensive really fast. Can’t really avoid it, honestly.
Remember that Level 1 still applies to all monitors that don’t include self-calibration hardware.
In the grand scheme of things, some things you’re still losing out on in this price range are:
True 10-bit displays - This is why that 5k iMac is the yummiest of Apple’s offerings. True 10-bit displays are not only more expensive on this specification alone, but are usually coupled with more advanced panel & firmware technologies, compounding the cost of the display, often putting you in the $3000+ range. Like the other Mac displays, most of these panels are 8-bit + FRC, a way of emulating a 10-bit display. It certainly gets you a chunk of the way there, and it’s certainly an improvement over just 8-bit, but it’s not the same animal as true 10-bit.
Panel technology - It’s not OLED, but OLED is expensive as sh**. Really, the continual evolution of panel technologies at these price points is worth watching, because this is where most of the competition is at. Currently, if I had to choose, I’d go for a GB-r LED panel over a W-LED or regular RB-LED - but there are other specs to consider, and of course, cost.


Level 3 Continued: Pairing the monitor with an output device.
Here’s the thing. Whether you’ve got a true 10-bit monitor or a “quasi-10-bit” 8-bit + FRC one, both of these still need to receive a 10-bit signal from your computer to actually give you a benefit. If you’re already super strained on budget at this point, you can run your current video card to it - but if it isn’t a Quadro or Radeon Pro, it’s going to be 8-bit. You’ll still benefit from the other display specs, though, including color gamut. This might be an acceptable temporary hold point for you. Or maybe you can push a bit more, and get everything out of that display!
First, I want to clarify some confusion around 10-bit output and video cards. There are consumer monitors that tout 10-bit/HDR support, as well as consumer & prosumer video cards that tout the ability to output a 10-bit signal. So, why am I about to focus on Quadros for 10-bit output? The 10-bit/HDR support in consumer/prosumer products are for DirectX applications only. That means exclusively video games and some video players. Bummer.
Moving on…
Your two budget-friendly approaches to this topic are to have the 10-bit signal come from your main video card, or a secondary device. The common route is a secondary device.
From the main video card
Basically, the best Quadro that you can afford. Why I’m not acknowledging Radeon Pro’s here is another topic for another article, but the short version is that CUDA has won this sector of the industry, and Radeon Pro’s don’t support CUDA.
A major thing to consider is that video editing, color grading, motion graphics, and design solutions are increasingly focused on GPU acceleration from your video card for general performance, meaning having a strong GPU (10-bit or not) is an increasingly significant factor for overall software performance. This means that, while you can find some really cheap Quadros just for 10-bit output, it’s all for naught if the lacking general performance makes getting things done a total chore.
Quadros get really expensive when we consider trying to get the highest FP32 performance (the main route of performance for most creative software). Gaming cards around the $1000 mark have already moved beyond 10 TFLOPS FP32. This is a major component of why a lot of creatives go with a consumer/prosumer card, and choose another route to feed a 10-bit display. However, you might not have space to add devices beyond a single video card, or you might want to play off of some other strengths of a Quadro, like FP16 (half-precision) and FP64 (double precision) for other applications, namely in the realm of some 3D/CAD work. It’s all so tricky.
The theme of this article is “on a budget” and “just getting off your feet.” So, here are some recommendations:


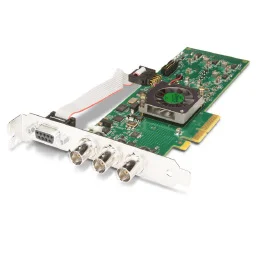
2. From a secondary (I/O) device
This is a common route that people take. There are a number of reasons why this may be the better choice for you:
Future cost savings — a dedicated device for 10-bit output means that you can upgrade your main video card later, without worrying about it also having to put out 10-bit. A single 10-bit output device can stay with you through multiple generations.
Immediate cost savings — No requirement to replace your current video card, and there are options available to you well below the $1000-ish for a worthwhile Quadro.
Your only choice — there are scenarios where certain video software might be expecting a dedicated I/O device, and in these scenarios, you’re in for a hassle if you don’t have one.
Future proofing — monitors at the above price points focus on HDMI and Displayport for inputs, but the super-expensive high-end monitors focus on SDI inputs. This means that, while you may need to use an adapter to get the signal to your monitor for now, you’re ready to run a straight line via SDI when you graduate to a high-end monitor.
However… there’s a caveat:
These devices are for external/secondary screens, and aren’t functional for a single primary display.
If you’re planning to use Davinci Resolve, your only supported choices are Blackmagic hardware!


The above Blackmagic options are also the cheapest. If your budget allows (and you’re not counting on using Davinci Resolve), you can also consider:

More to come.
I’ve got more to add to this article and will return with updates. Thanks!